| As of August 2020 the site you are on (wiki.newae.com) is deprecated, and content is now at rtfm.newae.com. |
AES-CCM Attack
WARNING: This page under construction!
The following is an overview of the AES-CMM attack done by Eyal Ronen et al., detailed in their draft/limited release paper IoT Goes Nuclear: Creating a ZigBee Chain Reaction (research paper website), IACR E-print submission. If using this attack please do not cite this page, instead cite the research paper only. The paper is currently a draft so there is no proceedings information etc as it has not yet been presented anywhere, but you can cite the E-Print version.
This page is presented as an example of using Python/ChipWhisperer to perform attacks against the AES-CCM cipher, without needing to do a more complex attack against AES-CTR mode.
Contents
AES-CCM Overview
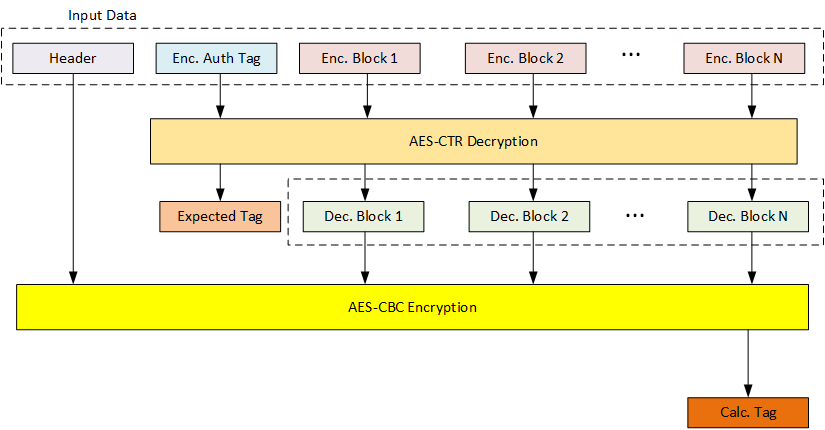
AES-CCM provides both encryption and authentication using the AES block cipher. This is a widely used mode since it requires only a single cryptographic primitive. That primitive is used in two different modes: CBC and CTR mode. The following shows how AES-CCM generally works:
The "Calculated Tag" and "Expected Tag" are compared together, and only if they match is the decrypted data used. A change of any of the data blocks OR the header would change the calculated tag, resulting in an error.
Some nice features of AES-CCM:
- Can decrypt any data block, or decrypt blocks out of order due to AES-CTR usage.
- Authentication Tag provides authentication that data has not been modified in transit.
- Auth tag can include non-encrypted information, such as a header with address or length information.
- Auth tag can be shortened (i.e., not full 16-byte length) for use with protocols with very sensitive length limitations.
The difference between the two modes is explained below:
Cipher Block Chaining (CBC): The plaintext is XORed with the previous ciphertext before being encrypted. There is no ciphertext before the first plaintext, so a randomly chosen initialization vector (IV) is used instead:
Counter (CTR): An incrementing counter is encrypted to produce a sequence of blocks, which are XORed with the plaintexts to produce the ciphertexts:
In AES-CCM mode, the AES-CBC encryption is used to generate a nice "authentication tag". If a single byte changed anywhere in the data fed into the AES-CBC block, the final output will differ.
The AES-CTR mode is used for the actual data encryption. Note AES-CTR encryption and decryption is the same operation, as AES-CTR is basically generating a unique "pad" we XOR with the data.
Additional usage information:
- A nonce format is required for AES-CTR. This nonce can be based on information in the packet, such as source address, or be random.
- An IV is required for the AES-CCM block. This I.V. can be sent (possibly encrypted) to the AES-CCM block, or be part of secret information stored in the bootloader.
Example Bootloader Details
To perform this attack, we will define a simple bootloader. We will be using this example since we cannot use AES-CCM "standalone" without having a little bit of structure (i.e., how we do the AES-ECB demos). This `bootloader' is really just a demo of something that downloads a block of encrypted data, since it doesn't perform any actual bootloading.
The example bootloader has a simplified AES-CCM implementation (NB: do NOT use this as a reference for a good implementation!). It accomplishes the basic goals only of having:
- Header data that is authenticated but not encrypted
- An encrypted MAC tag
- A bunch of encrypted firmware blocks
Each block sent to the bootloader is 19 bytes long. The first byte indicates the type - header, auth tag, or data. If a new 'header' message is received it will abort any ongoing processing of existing data and restart the bootloader process.
All messages share this feature:
- CRC-16: A 16-bit checksum using the CRC-CCITT polynomial (0x1021). The LSB of the CRC is sent first, followed by the MSB. The bootloader will reply over the serial port, describing whether or not this CRC check was valid.
Header Frame
-
0x01: 1 byte of fixed header - Header Info: 14 bytes of "header" data which could be version or other such stuff.
- Length: Number of encrypted data frames (NOT including the auth-tag frame) that will follow.
Note the 16 bytes of the header info + length are fed into the AES-CBC algorithm as part of the auth-tag generation. That is this data is authenticated but not encrypted.
+------+------+------+------+ .... +------+------+------+------+
| 0x01 |     Header Info (14 bytes)|    Length   |   CRC-16    |
+------+------+------+------+ .... +------+------+------+------+
Auth Tag Frame
-
0x02: 1 byte of fixed header - Auth-Tag: The expected output of the AES-CBC algorithm after processing the authenticated only data + decrypted data frames. This is then encrypted in AES-CTR mode with the CTR set to 0.
       |<----- Encrypted block (16 bytes) ------>|
       |    AES-CTR Encryption with CTR=0        |
       |                                         |
+------+------+------+------+ .... +------+------+------+------+
| 0x02 |     Auth-Tag (encrypted MAC)            |   CRC-16    |
+------+------+------+------+ .... +------+------+------+------+
Data block frame
-
0x03: 1 byte of fixed header - Encrypted Data: Data encrypted in AES-CTR mode, with the CTR starting at 1 and incrementing.
       |<----- Encrypted block (16 bytes) ------>|
       |   AES-CTR Encryption with CTR=1,2,3..N  |
       |                                         |
+------+------+------+------+ .... +------+------+------+------+
| 0x03 |            Data (16 Bytes)              |   CRC-16    |
+------+------+------+------+ .... +------+------+------+------+
The bootloader responds to each command with a single byte indicating if the CRC-16 was OK or not:
            +------+
CRC-OK:     | 0xA1 |
            +------+

            +------+
CRC Failed: | 0xA4 |
            +------+
Once ALL messages are received, the bootloader will respond with a signature OK or not message:
            +------+
Sig-OK:     | 0xB1 |
            +------+

            +------+
Sig Failed: | 0xB4 |
            +------+
Note details of the AES-CTR nonce, AES-CBC I.V., and key are stored in the firmware itself. In this example they are not downloaded as part of the encrypted firmware file.
Background on Attack
The following will use the notation from IoT Goes Nuclear: Creating a ZigBee Chain Reaction. This notation will be adopted throughout this wiki page.
From the figure of AES-CCM, you can see that we don't directly control the input to any of the AES blocks. It could be possible to perform an AES-CTR attack (such as described by J. Jaffe in A First-Order DPA Attack Against AES in Counter Mode with Unknown Initial Counter), but this will have issues if the bootloader limits the number of blocks we can send.
But, as it turns out we can still break AES-CBC with a little additional computational effort (but not requiring any additional traces).
Breaking AES-CBC Encryption with unknown I.V.
If you've performed a standard CPA attack, you'll realize the problem with attacking AES-CBC is we don't directly control the input, which we call  . Instead it's XORd with some unknown bytes (the AES-CBC ciphertext output).
But if we are always attacking the same block (that is, we reset the AES state to initial by say resetting the device, and rerun the algorithm up to the first block), the unknown bytes are constant. As it turns out this is a pretty easy problem to solve. The first step is to perform a standard CPA attack. The only issue is we won't recover the actual encryption key used  , instead we recover
  , since we basically roll all the constant inputs into what we call a `modified key'. Note
  is the output of the previous-block AES-CBC ciphertext.
In what might seem like magic, we can use this modified key to directly determine the second-round key (the true key). This was originally presented by J. Jaffe in A First-Order DPA Attack Against AES in Counter Mode with Unknown Initial Counter. The reason this works is if you remember we recovered  . In the AES algorithm the first thing we do is the AddRoundKey, which is:
 .
.
In the true algorithm we have the case of:

And when we use our modified key, we are feeding the PT directly into AddRoundKey:

Where the  basically includes those additional constants, instead of them being added to the plaintext as part of the input processing. Ultimately it means the output of AddRoundKey, and thus processing of later rounds, is identical in both cases. So we can perform a CPA attack on the 2nd-round key, and directly recover the "true" first-round key by rolling back the key schedule.
This is the solution now - we simply perform a CPA attack on the 2nd round of the AES algorithm, where we use the AES algorithm to determine the inputs to the second-round based on our modified key & the known plaintext.
Performing Attack
Building Example
There is an example of a simple bootloader which uses AES-CCM in the firmware directory. A hex-file is also present for the Atmel XMEGA device on the ChipWhisperer-Lite board.
Collecting Traces
Collecting traces requires the following steps:
- Program into the target the aes-ccm bootloader. This bootloader can be found in the git repo, which also includes a .hex file.
- Set the target type to the special AES-CCM bootloader driver. This target module is detailed in the appendix on this page, you can copy that code into a new file in the `target' directory.
- Run a capture with ~500 traces. Use 1x CLKGEN for the ADC speed and the full point-range to be able to capture both software AES rounds. See capture script example for details.
Step #1: AES-CBC MAC Block #1
The first step is to recover the AES encryption key used in round 1. This isn't too difficult - we'll first take our power traces, which if you recall look something like this:
I've gone out of my way & marked the location of AES on it. Let's assume you didn't have that - why might you do? We can actually first do a CPA attack with the "XOR" leakage model to determine where data is being manipulated.
1-B: Finding interesting areas
Doing this requires switching the attack algorithm to the AddRoundKey output (where AddRoundKey is just an XOR operation):
Note running it against all points might give you a memory error (especially on a 32-bit system). We don't need all bytes though, so to avoid this just change these settings:
- Only enable a single subkey (i.e., say byte 0).
- Set reporting interval & traces per attack to same value (say 100 I used here).
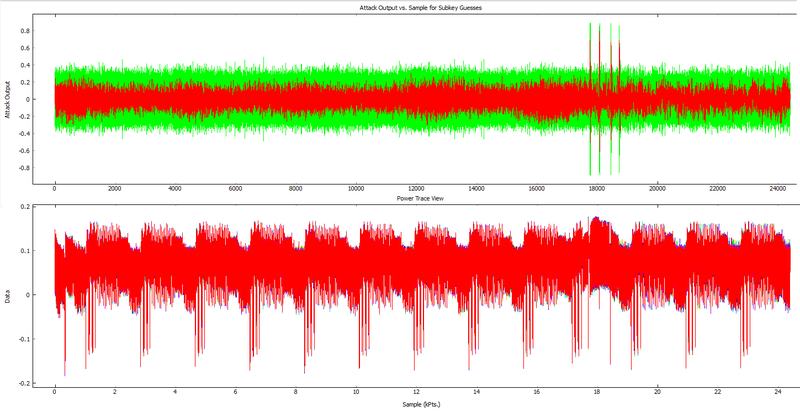
The result will show you correlation where the input data was used (possibly XORd with any constant). You'll get something like the top graph, where I've added an overlay of the power trace below it:
Note this is basically showing us where the AES-CTR output occurs, then where the AES-CBC input happens. The correlations correspond to the following I think (there may be a mixup of where the load occurs - if any of those intermediate states are loaded/saved it would show up):
- Load of CT data.
- XOR of AES-CTR output 'pad' with input CT.
- XOR of previous with the old AES-CBC state as part of AES-CBC input processing.
- AddRoundKey of previous during AES-ECB block.
1-C: Modified First-Round Key
The first step is to perform a standard CPA attack. Remember we won't recover the actual encryption key used  , instead we recover
  , since we basically roll all the constant inputs into what we call a `modified key'.
So let's do a first-round attack focused around points (180000,22000) to start (roughly picked from the power traces). To do this:
- Turn back on all bytes (if previously disabled).
- Switch leakage model to S-Box output.
You'll likely find after a number of traces you could plot correlation for bytes 0 & 15, and get a better idea where the attack should happen. Looking at the following I can see we could focus on points (18600,19200) and might get a more reliable attack.
Finally, you should get this `modified key', in this example we can see it appears to be 94 28 5D 4D 6D CF EC 08 D8 AC DD F6 BE 25 A4 99:
The next step is to use this to recover the complete round-key.
1-D: True Second-Round Key
In what might seem like magic, we can use this modified key to directly determine the second-round key (the true key). This was originally presented by J. Jaffe in A First-Order DPA Attack Against AES in Counter Mode with Unknown Initial Counter, and details were described earlier in this page.
For our case we are using  , that is we don't have
  directly, but we actually have the input to the AES-CTR decryption. Ultimately the AES-CTR output will become another unknown constant we will deal with later.
To repeat the previous explanation: the reason this works is if you remember we recovered  . In the AES algorithm the first thing we do is the AddRoundKey, which is:
 .
.
In the true algorithm we have the case of:

And when we use our modified key, we are feeding the CT directly into AddRoundKey:

Where the  basically includes those additional constants, instead of them being added as part of the ciphertext. Ultimately it means the output of AddRoundKey, and thus processing of later rounds, is identical in both cases. So we can perform a CPA attack on the 2nd-round key, and directly recover the "true" first-round key by rolling back the key schedule.
This requires a custom leakage model, which we can make fairly easily:
from chipwhisperer.analyzer.attacks.models.AES128_8bit import AESLeakageHelper

class Round2(AESLeakageHelper):
    name = 'HW: Round-2 Key'
    def leakage(self, pt, ct, key, bnum):
        r1key = [0x94, 0x28, 0x5D, 0x4D, 0x6D, 0xCF, 0xEC, 0x08, 0xD8, 0xAC, 0xDD, 0xF6, 0xBE, 0x25, 0xA4, 0x99]
        state = [pt[i] ^ r1key[i] for i in range(0, 16)]
        state = self.subbytes(state)
        state = self.shiftrows(state)
        state = self.mixcolumns(state)
        return self.sbox(state[bnum] ^ key[bnum])
And we insert it into the system by modifying the analysis script in initAnalysis():
leakage_object = chipwhisperer.analyzer.attacks.models.AES128_8bit.AES128_8bit(Round2)
You can perform the same CPA attack, modified to occur around the second round. In this example I found points (20520, 21950) worked well - but you can try a much larger point-range, and then scale that down to get a faster calculation. This gives us the round-2 key, in this example appears to be AA 61 B3 E3 C7 AE 5F EB 1F 02 82 1D A1 27 26 84:

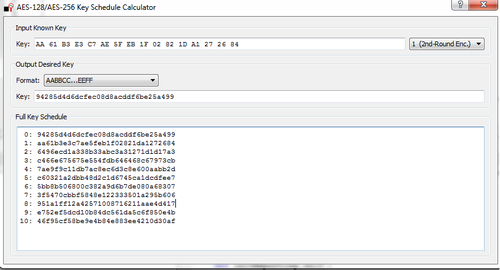
Using the key-schedule widget, you can then determine the true initial key was 94285d4d6dcfec08d8acddf6be25a499 (which matches what was programmed in this example):
Note in addition you can perform the operation  to recover
  . If we knew either one of those we could then completely break AES-CCM, since we would know the AES-CBC I.V., along with the AES-CTR nonce/format.
For a well-known implementation (say in IEEE 802.15.4) we are done, as the nonce format is known. You can perform an encryption with the known nonce to recover  , then immediately recover
  . Note this isn't the true I.V. as written in the file, but the result of the AES-CBC state up until the first encryption block was performed. Thus you cannot change the authentication-only blocks without doing further work to reverse back to the original I.V.
In the event the AES-CTR nonce input is unknown, additional work is required (detailed below).
Step #2A: AES-CBC MAC Block #2
Repeating this for block #2 is exactly the same as before. Note you will need to perform a capture which triggers on the second block, which may require changes to the firmware source code.
Once you recover Block #1, you can calculate  . Recovering block #2 means you could use
  to determine
  . Then you can decrypt
  to determine the AES-CTR nonce format.
Step #2B: AES-CTR Pad Output DPA
As an alternative to doing the CPA attack on a second block, we can use a DPA attack to figure out the AES-CTR output pad. The advantage of the DPA attack method is it doesn't require any additional traces to be captured.
To begin with, we'll be using stand-alone Python scripts for this. The first thing we'll do is simply display differences, where we assume the key was "0x00", and an XOR leakage model. This will simply give us positive/negative spikes depending on the value of bits being XORd with the known input data. A simple script to do this is:
from chipwhisperer.common.api.CWCoreAPI import CWCoreAPI
from matplotlib.pylab import *
from chipwhisperer.analyzer.utils.populations import partition_traces, dpa
import chipwhisperer.analyzer.utils.partitiontools as ptools
import chipwhisperer.analyzer.attacks.models.AES128_8bit as AES128_8bit

class XOR_Test(AES128_8bit.AESLeakageHelper):
    name = 'HW: XOR Test'
    def leakage(self, pt, ct, key, bnum):
        return pt[bnum] ^ key[bnum]

cwapi = CWCoreAPI()
cwapi.openProject(r'c:\users\colin\chipwhisperer_projects\tmp\aes_ccm_block1_500traces_clk1x.cwp')

tm = cwapi.project().traceManager()
ntraces = tm.numTraces()

mod = XOR_Test()

col = ['r', 'b', 'g', 'm', 'k', 'c', 'y', 'b--']

for bnum in [0]:
    print "Working on byte %d"%bnum
    for bit in range(0, 8):
        print "  Bit %d"%bit
        bmask = 1<<bit
        ptool = ptools.HWAES(tm, bnum=bnum, model=mod, bmask=bmask)
        groups = partition_traces(tm,ptool,0, key_guess=0x00)
        diff = dpa(groups)

        plot(diff, col[bit])
        hold(True)

show()
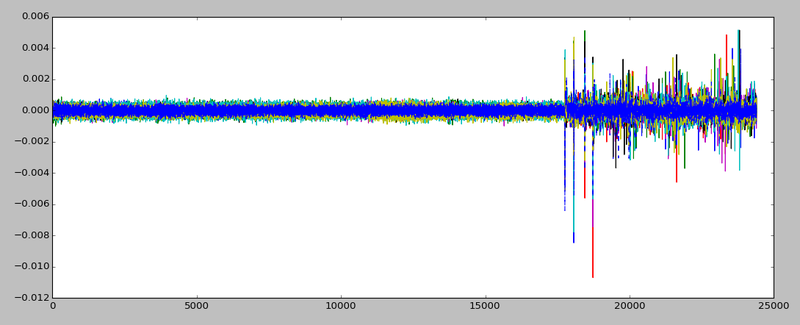
The results should look something like this:
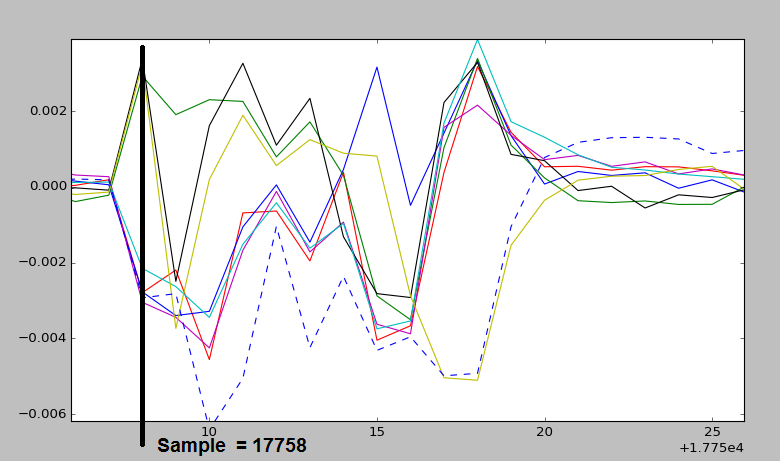
You might notice the 4 spikes will line up with the spikes coming from the XOR correlation. Of interest if we zoom in on the first spike, we should be able to detect multiple "paths" being taken. We'll set a threshold location somewhat arbitrarily as a first test:
Now we'll simply go through and read off each bit by deciding if it's above/below zero. Note that (a) there is multiple potential threshold locations, and (b) you might get the inverse of the correct answer (each bit flipped) depending on your hardware. In practice we might need to test a few possible locations.
By doing the same plotting operation with bnum = 1, then bnum = 2, you should be able to figure out the "shift". This is to say how many points you need to move forward in time by, in this case it was 19 points. A final example attack that worked on my system (again you'll have to modify startingpoint and diffpoint):
from chipwhisperer.common.api.CWCoreAPI import CWCoreAPI
from matplotlib.pylab import *
from chipwhisperer.analyzer.utils.populations import partition_traces, dpa
import chipwhisperer.analyzer.utils.partitiontools as ptools
import chipwhisperer.analyzer.attacks.models.AES128_8bit as AES128_8bit

class XOR_Test(AES128_8bit.AESLeakageHelper):
    name = 'HW: XOR Test'
    def leakage(self, pt, ct, key, bnum):
        return pt[bnum] ^ key[bnum]


cwapi = CWCoreAPI()
cwapi.openProject(r'c:\users\colin\chipwhisperer_projects\tmp\aes_ccm_block1_500traces_clk1x.cwp')

tm = cwapi.project().traceManager()
ntraces = tm.numTraces()

mod = XOR_Test()

startingpoint = 17758
diffpoint = 19

best_guess = [0] * 16

for bnum in [0]: #Use this first to test on a single byte
#for bnum in range(0,16): #Uncomment this to break all bytes
    print "Working on byte %d"%bnum
    bguess = 0
    for bit in range(0, 8):
        print "  Bit %d "%bit,
        bmask = 1<<bit
        ptool = ptools.HWAES(tm, bnum=bnum, model=mod, bmask=bmask)
        groups = partition_traces(tm,ptool,0, key_guess=0x00)
        diff = dpa(groups)

        dp = diff[startingpoint + (diffpoint*bnum)]
        print " (%+0.4f) = "%dp,

        if dp > 0:
            print "1"
            bguess |= bmask
        else:
            print "0"

    print " guess = %02X"%bguess
    best_guess[bnum] = bguess

print("Best Guess: [" + ", ".join(["0x%02X"%x for x in best_guess]) + "]")
Finally - we decrypt the best guess. If this was a valid AES-CTR mode output we'd expect to see the lower bytes as being 00 01 for the first data packet:
from Crypto.Cipher import AES
key_from_cbcattack = [0x94, 0x28, 0x5D, 0x4D, 0x6D, 0xCF, 0xEC, 0x08, 0xD8, 0xAC, 0xDD, 0xF6, 0xBE, 0x25, 0xA4, 0x99]
aes = AES.new(str(bytearray(key_from_cbcattack)), AES.MODE_ECB)
best_guess = [0x54, 0x61, 0xEB, 0x14, 0xE7, 0x7A, 0xD5, 0xD9, 0xB8, 0x7A, 0xB9, 0x46, 0x57, 0xA4, 0x49, 0xAA]
ctr_test = aes.decrypt(str(bytearray(best_guess)))
print(" ".join(["%02x"%ord(x) for x in ctr_test]))
This gives us the decrypted value of c1 25 68 df e7 d3 19 da 10 e2 41 71 33 b0 00 01. This happens to be the same value as saved in the bootloader supersecret.h file, with the expected counter values. So it looks like our attack was a success! We now know the AES-CTR nonce.
NB: The nonce in your firmware file (saved in supersecret.h) will probably be different from this.
Bootloader Interface Code
#!/usr/bin/python
# -*- coding: utf-8 -*-
#
# Copyright (c) 2013-2016, NewAE Technology Inc
# All rights reserved.
#
# Authors: Colin O'Flynn, Greg d'Eon
#
# Find this and more at newae.com - this file is part of the chipwhisperer
# project, http://www.assembla.com/spaces/chipwhisperer
#
#    This file is part of chipwhisperer.
#
#    chipwhisperer is free software: you can redistribute it and/or modify
#    it under the terms of the GNU General Public License as published by
#    the Free Software Foundation, either version 3 of the License, or
#    (at your option) any later version.
#
#    chipwhisperer is distributed in the hope that it will be useful,
#    but WITHOUT ANY WARRANTY; without even the implied warranty of
#    MERCHANTABILITY or FITNESS FOR A PARTICULAR PURPOSE.  See the
#    GNU Lesser General Public License for more details.
#
#    You should have received a copy of the GNU General Public License
#    along with chipwhisperer.  If not, see <http://www.gnu.org/licenses/>.
#=================================================

import sys
import time
import chipwhisperer.capture.ui.CWCaptureGUI as cwc
from chipwhisperer.common.api.CWCoreAPI import CWCoreAPI
from chipwhisperer.capture.targets.SimpleSerial import SimpleSerial
from chipwhisperer.common.scripts.base import UserScriptBase
from chipwhisperer.capture.targets._base import TargetTemplate
from chipwhisperer.common.utils import pluginmanager
from chipwhisperer.capture.targets.simpleserial_readers.cwlite import SimpleSerial_ChipWhispererLite
from chipwhisperer.common.utils.parameter import setupSetParam
import logging

# Class Crc
#############################################################
# These CRC routines are copy-pasted from pycrc, which are:
# Copyright (c) 2006-2013 Thomas Pircher <tehpeh@gmx.net>
#
class Crc(object):
    """
    A base class for CRC routines.
    """

    def __init__(self, width, poly):
        """The Crc constructor.

        The parameters are as follows:
            width
            poly
            reflect_in
            xor_in
            reflect_out
            xor_out
        """
        self.Width = width
        self.Poly = poly


        self.MSB_Mask = 0x1 << (self.Width - 1)
        self.Mask = ((self.MSB_Mask - 1) << 1) | 1

        self.XorIn = 0x0000
        self.XorOut = 0x0000

        self.DirectInit = self.XorIn
        self.NonDirectInit = self.__get_nondirect_init(self.XorIn)
        if self.Width < 8:
            self.CrcShift = 8 - self.Width
        else:
            self.CrcShift = 0

    def __get_nondirect_init(self, init):
        """
        return the non-direct init if the direct algorithm has been selected.
        """
        crc = init
        for i in range(self.Width):
            bit = crc & 0x01
            if bit:
                crc ^= self.Poly
            crc >>= 1
            if bit:
                crc |= self.MSB_Mask
        return crc & self.Mask


    def bit_by_bit(self, in_data):
        """
        Classic simple and slow CRC implementation.  This function iterates bit
        by bit over the augmented input message and returns the calculated CRC
        value at the end.
        """
        # If the input data is a string, convert to bytes.
        if isinstance(in_data, str):
            in_data = [ord(c) for c in in_data]

        register = self.NonDirectInit
        for octet in in_data:
            for i in range(8):
                topbit = register & self.MSB_Mask
                register = ((register << 1) & self.Mask) | ((octet >> (7 - i)) & 0x01)
                if topbit:
                    register ^= self.Poly

        for i in range(self.Width):
            topbit = register & self.MSB_Mask
            register = ((register << 1) & self.Mask)
            if topbit:
                register ^= self.Poly

        return register ^ self.XorOut


class BootloaderTarget(TargetTemplate):
    _name = 'AES-CCM Bootloader'

    def __init__(self):
        TargetTemplate.__init__(self)

        ser_cons = pluginmanager.getPluginsInDictFromPackage("chipwhisperer.capture.targets.simpleserial_readers", True, False)
        self.ser = ser_cons[SimpleSerial_ChipWhispererLite._name]

        self.keylength = 16
        self.input = ""
        self.crc = Crc(width=16, poly=0x1021)
        self.setConnection(self.ser)

    def setKeyLen(self, klen):
        """ Set key length in BITS """
        self.keylength = klen / 8

    def keyLen(self):
        """ Return key length in BYTES """
        return self.keylength

    def getConnection(self):
        return self.ser

    def setConnection(self, con):
        self.ser = con
        self.params.append(self.ser.getParams())
        self.ser.connectStatus.connect(self.connectStatus.emit)
        self.ser.selectionChanged()

    def con(self, scope=None):
        if not scope or not hasattr(scope, "qtadc"): Warning(
            "You need a scope with OpenADC connected to use this Target")

        self.ser.con(scope)
        # 'x' flushes everything & sets system back to idle
        self.ser.write("xxxxxxxxxxxxxxxxxxxxxxxxxxxxxxxxxx")
        self.ser.flush()
        self.connectStatus.setValue(True)

    def close(self):
        if self.ser != None:
            self.ser.close()
        return

    def init(self):
        pass

    def setModeEncrypt(self):
        return

    def setModeDecrypt(self):
        return

    def convertVarToString(self, var):
        if isinstance(var, str):
            return var

        sep = ""
        s = sep.join(["%c" % b for b in var])
        return s

    def loadEncryptionKey(self, key):
        pass

    def loadInput(self, inputtext):
        self.input = inputtext

        framemsg = [0] * 16
        framemsg[15] = 1
        logging.debug("Sending header")
        self.sendBootloaderMessage(1, framemsg)
        logging.debug("Sending auth tag")
        self.sendBootloaderMessage(2, [0]*16)

    def readOutput(self):
        # No actual output
        return [0] * 16

    def isDone(self):
        return True

    def checkEncryptionKey(self, kin):
        return kin

    def go(self):
        logging.debug("Sending input data")
        self.sendBootloaderMessage(3, self.input)

    def sendBootloaderMessage(self, ftype, data):

        # Starting byte is 0x01, 0x02, or 0x03
        message = [ftype]

        # Append 16 bytes of data
        message.extend(data)

        # Append 2 bytes of CRC for input only (not including type)
        crcdata = self.crc.bit_by_bit(data)

        message.append(crcdata >> 8)
        message.append(crcdata & 0xff)

        # Write message
        message = self.convertVarToString(message)
        self.ser.flush()
        self.ser.write(message)
        time.sleep(0.05)
        data = self.ser.read(1)

        if len(data) > 0:
            resp = ord(data[0])
            if resp != 0xA4:
                raise IOError("Failed to communicate, last response: %x" % resp)
        else:
            raise IOError("Failed to communicate, no response")
